Sunday, 8 June 2014

2D Platforming in Unity using Raycasts - Moving Platforms

Ooh how good it feels to be writing this series again. I have been thinking about this topic for a long time since one reader, one +Jesse LeBlanc, requested it. I have been crazy busy but now I've got some time so MOVING PLATFORMS!

The Goal

Okay, so we want a moving platform. What does that mean, really? Does the platform just move side to side? Up and down? Either or both? In circles? On a track? A series of them going from one side of the screen to the other, spawning ad infinitum?

Before I move on:


I have found the simplest and most useful system for moving a platform is with Nodes. Nodes in this case are [nearly] empty Game Objects whose only purpose is to serve as a target for a moving platform. Much of this is done in Unity's magnificent Inspector. Here's a screenshot of my moving platform and its nodes in-engine:


The Platform has a public Transform[] (array) which you can drag and drop as many things as you want into. Our aim then is to move the platform towards a node, and when it's close enough change the target to the next node.

How is it done? This is my method:


First, I determine my velocity by getting the direction towards the platform (the difference between my position and his, normalized) times my speed (in units per second) times Time.deltaTime (seconds). The resulting product's unit is distance (units) which makes the physics nerd in me happy (u/s * s = u). The next step is checking the distance between the platform's position and the node's position. If it's less than or equal to my speed, I make sure that this frame I'm going to move no more than that distance (Vector2.ClampMagnitude). Then I set my current node to the next node. What is NextNode? It's a Property I define here:


Okay, so your platform moves. What now?

I did two things beyond make a platform move between nodes. First, I made the platform push the player if the platform is moving side to side. Second, I made the platform carry the player around when you're standing on it. I'll explain them in the opposite order, though.

Ride that platform

Once I figured out how to do this, it was the simplest part of the whole procedure. The most important thing I realised is that the platform can't do this alone. It needs the player to store some information: in this case, whether the player is on top of the platform.

Since we already have a method of detecting what's underneath the player, I'm really just going to plug some code into that part of my player's gravity handling section.


If I connect with the ground, I use Unity's GetComponent function to see if it's a moving platform, then assign my variable myMovingPlatform to that. It's important to set the Moving Platform variable to null if you're not grounded! Later, the platform will ask the player if it's the platform the player is on, using this code:


...and that's it! Your player should ride the platform now. But our task is only half done. Now comes the arduous task of checking if the platform intersects with the player.

DISCLAIMER: This method is not very optimal, and if you have a bajillion moving platforms in your scene may eventually slow it down. If you want to optimise this code I suggest adding some system which checks what platforms are close enough to perform this test.

I find Unity's Rect (rectangle) class quite useful, but there is one function glaringly missing from its base functionality. It's something to check if two Rects overlap. I found it on the internet, though, after a minute of Googling. In addition, the BoxCollider2D class is sadly missing an inherent Rect variable which tells you the bounds of an object's collider. Here are my utility functions I'm using for this section:


Now that I have this, all I have to do is put the platform's Rect and the player's Rect into this function, and see if it returns True:


The next step is to set the player's position to flush with the platform:


And there you have it! Your platform should move smoothly.

Above and Beyond
There are lots of things moving platforms have done in different games. Just to name a few:

  • platforms that don't push you and that the player can walk right through;
  • keeping the momentum of a platform you're on and modifying the player's jump velocity with it;
  • platforms that start when you land on them;
  • platforms that disappear after a certain amount of time when you land on them;
  • or reappear after this last;
  • platforms that move any object that lands on it...
The list is endless. This is just the beginning. I hope you are inspired to put a fun new type of platform in your game!

Thanks for reading.
Stay moving, jumping dinosaur.

-mysteriosum(the deranged hermit)


Thursday, 17 April 2014

Recess Race: Updates coming soon!

Recess Race development is coming along. We released the first open beta at the start of the month, and it has revealed a few (big) flaws the game currently has. We are happy to say we know exactly what they are and how to fix them.

One of the big issues we have with the game is conveyance. Specifically, the method I tried to use to convey the controls has not been working, so (a) new one(s) must be implemented. For now, know this: press Z to jump and X to use items! These will also be customisable in the next version.

 Another feature we're adding is letter grading for each level. Depending on your performance (placement, style, garbage collected), you'll receive a letter grade from F to S+. F for FUN!

So, keep update so as not to miss a thing! Prove this bully wrong!


Thanks for reading. Until next time...

Stay powerful, lithe hunter.
-mysteriosum(the deranged hermit)

Thursday, 3 April 2014

Recess Race: Get ready...

A little while ago I wrote about how awesome having a team is. Having more talented, dedicated people divides production times immensely. Well, now we're releasing something, and it's because of those same people that it was possible!


Temp8 is the company of my buddy Will Farr, who is the artist for the game I'm working on, Recess Race. Hopefully you've both heard of it! He's been awesome, and so has our programmer, Richard Rail, who developed an entire ai for the bullies of Recess Race (calculating how to get perfectly from one end of the level to the other - not too shabby!).

I will be updating more, soon, with a build of the game! We're going into open beta, and we really need your help. We also have a survey that we hope you'll take the time to fill. It will help us figure out what to prioritize in the development in the game. Though the game is very close to my heart, I would like to get feedback from you guys to know what aspects of the game I should focus on in the spilling of my guts!

Thanks for reading. You guys are awesome.

Keep fighting, noble soldier.

-mysteriosum(the deranged hermit)

Saturday, 15 March 2014

Level Design and Flow

So Recess Race is coming along nicely, and I couldn't be happier about that.

What I am working on most right now is level design. I've had formal training in level design, but my experience in this field is still only a couple of years old. There's a lot I have to learn, and I learned something recently that I would like to share.

First, if you don't know about Flow - specifically the flow state as described by Mihaly Csikszentmihalyi - you may want to read up on it a little. If not, a whole lot. Like read the book of the same name.

tl;dr: the flow state is where you are so focused on a task or activity that you lose track of time, yourself, and everything unrelated to the task. Ever been so involved with something that when you looked at the clock you realise you should have left for work ten minutes ago? It's because you were in a flow state.

Video games aim to get the player into a flow state. It's how they hold your attention and get you addicted. Because the flow state is very addictive and a game that can reliably produce it is valuable to an individual.

One of my best friends was playing a level last night, and brought to my attention that certain specific spots were flow-breaking. I was defensive at first (as we always are... pff, artists, amirite?). Then I realised that was just about the worst thing my level could be. It should be catalytic to flow in as many ways as possible.

What breaks the flow?

This is one of the specific points my friend pointed out:


The black line is the jump arc of the character. The red box is the character's collision box. As you can see, jumping from that point, the player will collide with the side of that platform. I don't have ledge grabs in Recess Race; this means the player will have a hard time getting up to the top platform without being conscious of this. They will have to hold the jump button to get enough height to clear the platform, and also hold left for enough time to get on top of it - but not for too long, or they won't have time to turn around, and they'll fall off the other side.

This problem makes the player feel there's something wrong with the physics or the level. That's the problem right there: if the player knows it's their fault that's fine, they'll be willing (even excited) to try again. If they feel it's the level/game's fault, they'll get frustrated and become more likely to ragequit.

RULE: The player must know exactly why they failed, and must feel it's their own fault. Otherwise the flow will be broken and they will want to quit.

How difficult is too difficult?


Difficulty is a problem I've always had. I, like many young designers, tend to crank the difficulty when something is too easy for me. This is deadly. If something is difficult for you, who designed the level and have been working with the mechanics of the game for months, that means it will be nearly impossible for a player picking it up for the first time.

The philosophy I've adopted for Recess Race has been: easy to play, hard to master. This is something Nintendo has done best for decades, and it's present in every game they release. It's particularly important to inducing a flow state. Consider this flow chart (pun intended):


A condensed version of the theory behind this: when the challenges presented to you are appropriate to your skill level, you will be more likely to be in a flow state. If a challenge is too difficult you'll get anxious, and if it's too easy you'll get bored. You'll also notice there's some wiggle room here: that's because sometimes a challenge is just a bit too hard for you, and knowing "Oh man I can totally make this if I try for a few minutes" is an awesome feeling. Then you beat the challenge and your skills have improved, meaning challenges of that difficulty are no longer as daunting. And you climb the "Flow channel".

So, how does Nintendo do it? I'll make a list.

1) Simple or recognisable gameplay: everyone knows how to play a 2D Mario game, and if they don't then they're likely playing with someone who does and they'll learn. They've never necessitated players to learn more than 2 buttons: Jump and Run; A and B. This means that players can feel comfortable that they'll never have to learn another button, which is reassuring.

2) Secrets. Secrets everywhere: discovering a secret is fun. It's so satisfying! In pretty much every circumstance. Because there's lots of different kinds of secrets. To name a few:

  • Hidden mechanics or abilities: Super Mario 3D Land/World has a bunch of jump types. Crouch-jump, long jump, cartwheel jump (running in one direction, snap to the other direction and jump, gives you a higher jump than usual). None of them necessary to get to the end boss, but each super fun to discover/experiment with.
  • Collectibles: again, in Super Mario 3D Land, each level contains 3 star coins that are usually difficult to find or present an optional challenge. These are great because they can be as hard to get as the designers want, because they're not necessary to complete the game. The player knows there's 3 in each level, so they might not be a secret per se, but they are often well hidden which makes them nonetheless fun to find.
  • Secret collectibles: in Braid, there is a type of collectible that I didn't even know about after having (in my view) 100%'d the game. Someone told me they were there... and I had 20 more hours of gameplay in front of me. Sadly, this is an area Nintendo is not wont to delve into. They have in the past, but not for decades.
3) Difficulty settings: done wrong, difficulty settings are stupid and useless. However, done right, they can feel organic, empowering and enhance every user's experience. The Legend of Zelda: The Wind Waker HD is a great example. Right off the bat, you have the option of playing the game in Hero Mode. Wait, what? Awesome! I want to be a hero! ...I take double damage? And there are NO RECOVERY HEARTS?! Oh dear... well, here goes nothing. This difficulty setting was a fantastic move from Nintendo: they know a lot of people have played the game before, so they don't want those guys to get bored with the same challenges, and this is super easy to implement. It also shifts the player's focus considerably: I had to keep track of every fairy fountain and constantly go back to visit my grandma to get soup. Going into a Gauntlet room unprepared was deadly (but super fun, I'd recommend it :D ).

I feel strongly about difficulty settings and some day I'll do an article all on those. Point out some shining examples.

So how does this apply to Level Design?


Most of the points in the previous points are actually about game design. I'll list some things I think are important for your level to be fun from beginning to end.

Difficulty curve: the most important. If you aren't conscious of how difficult your level is at each point, it will be impossible to shape an enjoyable experience for the player. Your difficulty curve should actually look a lot like the wavy line of the Flow Channel chart above. To make your own difficulty curve, look at each challenge in your level and rate it on a level from 1-10. Then look at the figures: do they generally increase as the level goes on? Is there ever a jump of 3 or more units (that's generally bad)? Are there 'break' spots where the difficulty decreases after a particularly hard spot?

Placing ingredients: when I say ingredients, I mean anything in the level that the player interacts with. It can be a special type of platform, or an enemy, or a pick-up, or even a specific platform formation that requires a specific skill. Always introduce these on their own before placing them in combination with other ingredients. 


Here, the goomba is entirely on its own. You will either figure out a) it kills you, b) you can jump on it, or c) that you can jump over it and it's ok. Later on, you'll see it between two pipes so it patrols between them, or in combination with other types of enemies, or even just with more goombas. The challenge is much greater in combinations like these, so use them wisely. They can also be the most interesting and exciting moments for a player.

Give the player something to look forward to: this is difficult to explain, let alone pull off. It involves giving the player some kind of hook: something they know is going to come back later, or a task they need to work at for the whole level, or a big looming structure they hope they'll be able to visit later on. Some sort of mystery to keep them guessing; to give them a reason to keep playing. In Recess Race, it's the desire to finish well; to beat the other racers (bullies) who will beat you up/call you names if you get too close. You want to prove your worth! And the only way I let the player do that is by being awesome at the game. So the plan is to make the player feel as awesome as possible for as long as possible, and that means keeping them in a flow state :)

Well, that will be all for now. I hope you enjoyed these musings, and implement them in your game (if that's what you do!).

Until next time,
Keep flowing, super surfer.

-mysteriosum(the deranged hermit)

Thursday, 6 March 2014

Recess Race Announced!

This week has seen a big step for the deranged hermit and his friends. It is my pleasure to announce our game, Recess Race!


Many Hands Make Light Work


I've been working on Recess Race for months (as some of you know...). I've done several prototypes, and gone through many design transitions as a result. But, when I felt I had the final design down, Serendipity played her part and a team fell into my lap! I am working with Will from Temp8 and Richard-Bananas now, and after one month of production, we're already nearly done the alpha.

It is wonderful to work with other people, especially if those people are fun, intelligent, hard-working and like-minded. I recommend, to any of you lone indies reading this blog, find someone to work with whose skills differ from your own, but who shares similar goals. And trust fate! If you happen to meet someone who vaguely fits this description, do not hesitate! Pounce upon them and never let go.

Concept art: in-game "screenshot" mock-up

So... What IS Recess Race?


Recess Race is a 2D platformer racing game. It takes place at an elementary school, where the administration has organised a race event with the ulterior motive of cleaning up the yard. The participating children must race to the finish, all the while picking up as much trash as possible. But, the other racers are bullies! If you get too close, they'll beat you up or call you names.

Recess Race is a game that comes from the very depths of my soul. It has spawned from a tortured elementary school experience, where I was bullied more than anyone enrolled (in my head at least). I had to cope somehow, and that how was video games (and my awesome family). No matter how badly people treated me, I knew I could go home at the end of the day and play a video game. I could have an impact! I could use my skills to do some good. Whether that 'good' was rescuing a princess, getting food back from the malicious Dedede, or smiting the Maverick leader Sigma, I was responsible.

In-game screenshot! Pinky is this alternate universe's Kirby


I bring elements of these games into Recess Race. Mario Kart-style power ups include: booger armour that give you a Megaman X wall jump; a dapper tail coat which allows you to glide as in many Mario games; and a magic hat that allows you to float-jump like Kirby.

Next step: pre-alpha web release!


In the next week we're going to have a playable pre-alpha version on our website. If you would like to keep abreast of our activity, you may follow me on Twitter: @derangedhermits, or find Recess Race on Facebook here.

More news forthcoming! 

Thanks for reading. Until next time...
Stay strong, stalwart stewards.

-mysteriosum(the deranged hermit)

Monday, 3 March 2014

2D Platformer Collision Detection with Raycasts: One-Sided Platforms & LayerMasks

Something that happened magically while developing this system was one-sided platforms. That is, platforms that you can go through easily on one side, but from the other side it doesn't work, it's a wall.

I stumbled upon an elegant solution I love very much, and I will now share it with you!

These platforms are rad


Lots of platforms in Kirby can be accessed from underneath


So you may be asking yourself, "Why do I want these platforms?" The answer is usually: they're rad (sometimes, it's: you don't). They can add a lot of depth to your game. They give options during level design, opening up puzzles, dexterity challenges, and other such intricacies.

OK that's enough talking let's code.

Layermasks & Bitwise Operations


Layermasks are integers that inform a Raycast what to pay attention to. They are key. Once you start using them, you'll never go back and you'll be very glad you have this skill in your pocket.

What is a Bitwise operation? In this case, we'll be dealing with a bit shift. This requires a little bit of binary, so if you know all this stuff you can skip right to the line of code where the binary operation is.

Binary is a counting system exactly like our normal one (Decimal), but instead of counting all the way to 9 before reaching 10, we count to... 1. 0, 1, 10, 11, 100 are 0, 1, 2, 3, 4, respectively.

In any number system, the leftmost digit (or bit in binary) refers to how many of the highest exponent of the base are in the total value. In Decimal, 854 is literally 8 * 10^2 + 5 * 10^1 + 4 * 10^0. A 0 exponent always gives you 1 no matter what you're putting to it.

So, 11011001 is:
1 * 2^7 + 1 * 2^6 + 0 * 2^5 + 1 * 2^4 + 1 * 2^3 + 0 * 2^2 + 0 * 2^1 + 1 * 2^0
which simplifies to
2^7 + 2^6 + 2^4 + 2^3 + 2^0
which simplifies to
217

For Layermasks, we will go from 2 ^ 0 to 2 ^ 31. This is because we have 32 different layers in unity, each of which is assigned an integer from 0 to 31. If you say Layermask.NameToLayer("normalCollisions") in my code it will return 31.

So, the Layermask is always a 32 bit integer. But, what matters in a Layermask is not the value in Decimal, but the status of each bit. Each  Let's say your Layermask look like this:
1000 0000
0000 0000
0000 0000
0000 0000
The value is 1, but that doesn't matter. In this case, the Layermask tells the Raycast only to pay attention to 1 layer, Layer 0. If it looked like this:
1000 0000
0000 0000
0000 0000
0000 0001
then it would look at the first and the last layer. Its value is 2147483649 but again, that doesn't matter.

So how do we make a number look like this? Luckily you don't have to spell out your own binary numbers and convert them to Decimal. You just have to do a bit shift. A bit shift looks like this:

int collisionLayer = 1 << 31;

This means you're shifting a 1 to the 31st position in a binary sense. But that's just one layer. What if we want to do more than one layer? Easy.

int collisionLayerPlus = 1 << 31 | 1 << 30 | 1 << 0;

The | character indicates we're shifting more than one bit in an integer. Now the Layermask will look for collisions in the 31st, 30th and 0th layers. For fun, this is what the bit will look like:

1100 0000
0000 0000
0000 0000
0000 0001

If you're having trouble with any of this, please google Bitwise operations, or bit shifting, or even just layer masks and someone else will give you a better explanation (because there's lots out there :).

What I did was set up a class with static variables that contain these bitwise operations so I don't have to keep doing them in my code. This is what it looks like.


That's it! That's all it is. Now we use it elsewhere.

...What? You want an explanation of this too? OK fine...

Well first you'll notice the class doesn't inherit from MonoBehaviour. That's because it doesn't need to! I'm not going to put it on an object - in fact, I'm never even going to instantiate one. All it needs is those static ints that can be accessed from anywhere, at any time. I'll do that later.

The other fun thing in here is the static constructor. I don't fully understand how a static constructor works, but I guess it probably calls that when it needs to to give values to the variables I declare above. I can't use functions like Layermask.NameToLayer in a variable declaration like that so I had to use a static constructor.

Last, softBottom is what I call the kind of platform you can jump up through. softTop is what I call platforms you can fall through but can't jump up through. They're evil. And fun! :D

Now let's use the darn things!


Let's start with platforms that you don't hit your head on. Ones you can jump through from underneath but will then land on stably. Find the code where you look for things to bump your head on.

....we haven't done that, have we? Oh...

Well, we'll do it at the same time! It's related.

Here's the final code.


You'll notice it looks a lot like our other directional checkings. That's because it is pretty much the same.

There are two main points of interest here:


Here is where the character hits his or her head. If a platform is there, teleport to the point of contact, and set your velocity to 0. The other option (a la Mario) is to have a little rebound. I like to use a fraction of the upward velocity you were moving at, assigning it as a negative velocity.

And...


This is where we use the Raylayers class. It dictates what I'm going to detect with my up-layers. In this case, I will only bump my head on things in the NormalCollisions or SoftTop layers.

Now all you have to do is assign a platform the SoftBottom layer and you won't hit your head on it!

It's really that simple. A few lines of code and a lot of functionality. It's just as easy to add the SoftTop platforms (just add the right layermask) and to add one-way sideways platforms (which are also quite interesting).

I know my explanations in this post may be a little hasty, so if you have any questions please feel free to leave them in the comments and I'll get back to you as soon as I can. This was supposed to be a really short tutorial but it ended up... not being. ^_^

Thanks for reading!

Until next time...
Stay smart, little mite.

-mysteriosum(the deranged hermit)

Thursday, 13 February 2014

2D Physics in Unity with Raycasts: Slopes

Hello, faithful readers!

I have promised this update for a while, but have failed to deliver on account of being busy. I have done lots of acting in the last couple of weeks, and it has been great fun, but I'm starting to be sick of people and want to hole myself up with my squirrels for a while! Doing this tutorial (and more in the future) will help me forget other people exist for a while.

I actually did the coding for this within days of receiving the request, so this is far overdue.

The last post I did talked about jumping, and if you missed that you may want to look at it, though it's not necessary for this tutorial. What is necessary, though, is a basic understanding of the system: how I deal with gravity, and how I deal with lateral movement. Without having read these I'm afraid you'll be lost =)

Now, On To The Good Stuff

The first thing I did while trying to develop this system was put a slope in my scene and try it out. Turns out it kind of works already! Because of the way it's set up (the downward rays checking from the middle of the character), it teleports you to the point of contact in any case, so whether going up or down you'll still be in line with the slope in some respect.

It's far from perfect though. At first glance:
  • the character stops every time he reaches something like his max speed, because the side-check rays find the slope and think it's a wall;
  • the system only works when going up slopes of more than 90º (as in running to the left); 5+º (running to the right) slopes have you sink into them most of the way and cause all sorts of bugs;
  • we move the same speed as we would on a flat surface (which may or may not be desired); and
  • we jump straight up (again, we might want this but we'd like to have the option).
So that's just a couple of problems but they're still going to take a lot of work to sort. We're going to need some inspiration...

Case Studies

An important thing to do when tackling this sort of problem is ask yourself, "what have other people done?"

Super Mario World

For the first problem, I'm going to call on Super Mario World for the SNES.

What I'm going to for this is calculate the angle of the slope we're standing on. I will then use that  For reference, I'm going to link another guy, Jdaster64, who did an in-depth analysis of this stuff. Astounding.


From this, we see there are 4 angles of slope in Super Mario World: 11º, 23º, 45º and 67º. For 11º, there's no change for anything. So that tells us: we should consider implementing some threshold angles. For instance:
  • At 23º we reduce the player's max speed going uphill, and increase it going down;
  • At 45º the player starts moving automatically down the hill;
  • At 67º the player will have a very hard time controlling movement, and will even fall off the platform should they move with the slope enough.
We don't have to choose these exact angles, but we should set it up so that no matter the angle, we react accordingly. This means we're doing a general system, not a specific one - which may be the wrong thing to do, but that's what programming is all about!

Guacamelee

Guacamelee takes a much more laissez-faire approach to slopes, which is appropriate for its genre as Metroidvania (which always includes lots of combat). Ease of control is of paramount importance in this genre, so introducing hidden mechanics like those in SMW is not practical.

Guacamelee only has a couple of slope values, but in general it's a binary issue: either you can walk on the slope, or you can't. If you can walk on the slope you move at the same X speed as normal and jump straight up.

Frankly, this is the modern trend. Most platformers choose to doff the slope physics given to us by arguably Nintendo's greatest platformer. That's fine! Things are moving forward! With that in mind I won't go into how to bring SMW style slope mechanics to our projects just yet. I will focus on the most important problems.

Disclaimer: since the last tutorial on lateral movement, I changed this whole system to Unity's 2D physics. I did this because it's much easier to achieve a slanted collision with the 2D Polygon Collider than it is to make a 3D mesh in Blender or something and import it. If you can manage that last part go ahead; the system is almost identical.

What's Different in Physics2D?

Not much, really. The biggest thing is the Raycast method. Instead of returning a boolean, it returns a value directly to a RaycastHit2D object (making this a required step instead of an optional one). This is okay since we use RaycastHits anyway and it's just as easy to check if a RaycastHit2D hits something than it is to check a boolean.

Here's what the code now looks like:


Each Vector3 has been replaced with Vector2, we now test to see if (hitInfo.fraction > 0) instead of if (connected). hitInfo no longer has a .distance variable, so we have to make due with the hitInfo.fraction they give us. Other than those, pretty much the same thing.

Fix: Collision Problem (slopes aren't walls, silly)

The most immediate concern for us is the fact that we collide with slopes as if they're walls. I noticed this even on the slightest of curves, so it's time to mess with our lateral movement scripts a little.

What do we need to change?

The problem with the code as it stands is that the moment one of the rays hits something, the system goes "OH YEAH I got something it's a wall f'sho don't worry about it I got dis." This is not necessarily the case! I'll need to check how many rays hit, and retrieve the normal of the surface I hit. After all, if the slope is steep, we might hit the wall with multiple rays. This will also give us the tools to apply this to the downward rays.

This is what the new version of my Raycast section for lateral movement looks like:

The first thing you may notice reading from the top is that I've removed the +/- margin from the start and end points. This means I'll be checking right from the bottom to the very top of my character's collider:


The whole reason I had that margin to begin with was so that I wouldn't collide against the floor as if it were a wall. Now that I'm going to be calculating the angle between multiple rays' connection points, this is no longer relevant.

You'll also notice that instead of just using one RaycastHit2D, I'm using an array of them. This way I can reference any or all of them in or out of my for() loop.

When One Ray Just Isn't Enough

Now, first: how do we know we've connected with more than one ray? With a little variable I like to call lastFraction.


lastFraction does what it suggests: stores the value 'fraction' of the previous connecting ray's RaycastHit2D object. If its value is 0, that means no other ray has connected thus far, and we won't bother checking an angle or anything. We will simply store the current fraction in lastFraction.

Disclaimer: As it is, lastFraction is within the if(hitInfos[i].fraction > 0) clause, which means it doesn't get reset after a successful connection. As a result, any two successful rays will trigger a check. If you want to make it so that only 2 consecutive rays trigger it, put the last line of this block of code as the last note of your for () loop.

What's Your Angle?

To calculate the angle between two points, we'll use Vector2.Angle(). At first I tried just plugging both points into this and using that but that's not how Vector2.Angle() works. No, for Vector2.Angle, you pretty much always want the first argument to be Vector2.right, which is (1,0), or 0º. Then give it the difference between the two points, which will give you the delta of that Vector:


Now we see if it's within the proper range of what we want. In this case, I've set angleLeeway to 5, meaning if angle is less than 5 (or more than -5), we'll ignore it because it's not a wall. Of course, you may want to tell the player he can't climb up an 85º wall, so you can change angleLeeway as you see fit.

That's it for that! Your player should no longer think slopes are walls.

Fix: Sink Problem (The One Ray To Rule Them All)

The other major problem is that the player object seems to sink into the slope. In fact, the script will always use the first ray that connects as the reference for where it should be along the y axis. In this case, it's ray on the far left, so that's why when travelling right, he'll 'sink' into the slope.

So, to solve this problem, I've once again conjured Guacamelee as my reference. Here's how much Juan cares about slopes:
Why yes, this costume does imply that I 100%'d the game! Thanks for noticing! ^_^
Wow, Juan. Your one foot is barely touching the floor. Very suave. Realistic... oh well, we can't all be perfect!

This is actually a very sensible and intuitive solution. As a player, you might not even notice it without having it pointed out! It's certainly much less weird than if his foot were inside the floor. This also allows the level designer to put slopes of any angle and it doesn't matter a bit.

The Short Stick

Achieving this is surprisingly simple, from what we have so far. The system shoots multiple rays down from the central X axis of the player. All you have to do is determine which of those rays is the shortest, and use that in your calculations!

Here's what the final code looks like for this:


The first thing you'll notice if you're clever is that I'm once more using an array of RaycastHit2D. This is important for this problem, but we'll also use it later if we're going to implement slide-down-the-slope or jump-at-an-angle features down the line.

For Loop, For Loop on the Wall, Who's the Shortest of Them All?

To find the shortest ray, all you have to do is declare the variable smallest fraction and assign it later on.


We start it at Mathf.Infinity because everything is smaller than infinity :)

Also declare indexUsed, which will tell us what position of our RaycastHit2D array we want to reference when we finally give the command to hit the ground.

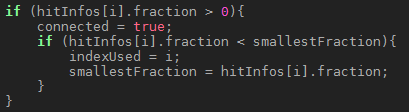
Then we want to assign these variables. Again, it's trivial:


Any fraction smaller than the smallestFraction value will set a new smallestFraction, and with it, the indexUsed variable. We use the index after the for() loop if connected is true, and go about our business as usual.


Since the system already teleports you to where the ray hit, there's no need to change anything else!

That's it for now...

I hope this helped those of you who are following me and have wanted to use slopes in your games. This system makes it so you can have slopes of any angle, with a cutoff angle where they start to be considered walls.

Next time I will go into more complex nuances of slopes, as described in the SMW breakdown. I don't think it'll be super complicated but it will be worth doing! If you have any questions at all, feel free to leave a comment. I will answer as soon as I can!

Thanks for reading.

Stay bright, burning star!

-mysteriosum(the deranged hermit)