Thursday, 6 March 2014

Recess Race Announced!

This week has seen a big step for the deranged hermit and his friends. It is my pleasure to announce our game, Recess Race!


Many Hands Make Light Work


I've been working on Recess Race for months (as some of you know...). I've done several prototypes, and gone through many design transitions as a result. But, when I felt I had the final design down, Serendipity played her part and a team fell into my lap! I am working with Will from Temp8 and Richard-Bananas now, and after one month of production, we're already nearly done the alpha.

It is wonderful to work with other people, especially if those people are fun, intelligent, hard-working and like-minded. I recommend, to any of you lone indies reading this blog, find someone to work with whose skills differ from your own, but who shares similar goals. And trust fate! If you happen to meet someone who vaguely fits this description, do not hesitate! Pounce upon them and never let go.

Concept art: in-game "screenshot" mock-up

So... What IS Recess Race?


Recess Race is a 2D platformer racing game. It takes place at an elementary school, where the administration has organised a race event with the ulterior motive of cleaning up the yard. The participating children must race to the finish, all the while picking up as much trash as possible. But, the other racers are bullies! If you get too close, they'll beat you up or call you names.

Recess Race is a game that comes from the very depths of my soul. It has spawned from a tortured elementary school experience, where I was bullied more than anyone enrolled (in my head at least). I had to cope somehow, and that how was video games (and my awesome family). No matter how badly people treated me, I knew I could go home at the end of the day and play a video game. I could have an impact! I could use my skills to do some good. Whether that 'good' was rescuing a princess, getting food back from the malicious Dedede, or smiting the Maverick leader Sigma, I was responsible.

In-game screenshot! Pinky is this alternate universe's Kirby


I bring elements of these games into Recess Race. Mario Kart-style power ups include: booger armour that give you a Megaman X wall jump; a dapper tail coat which allows you to glide as in many Mario games; and a magic hat that allows you to float-jump like Kirby.

Next step: pre-alpha web release!


In the next week we're going to have a playable pre-alpha version on our website. If you would like to keep abreast of our activity, you may follow me on Twitter: @derangedhermits, or find Recess Race on Facebook here.

More news forthcoming! 

Thanks for reading. Until next time...
Stay strong, stalwart stewards.

-mysteriosum(the deranged hermit)

Monday, 3 March 2014

2D Platformer Collision Detection with Raycasts: One-Sided Platforms & LayerMasks

Something that happened magically while developing this system was one-sided platforms. That is, platforms that you can go through easily on one side, but from the other side it doesn't work, it's a wall.

I stumbled upon an elegant solution I love very much, and I will now share it with you!

These platforms are rad


Lots of platforms in Kirby can be accessed from underneath


So you may be asking yourself, "Why do I want these platforms?" The answer is usually: they're rad (sometimes, it's: you don't). They can add a lot of depth to your game. They give options during level design, opening up puzzles, dexterity challenges, and other such intricacies.

OK that's enough talking let's code.

Layermasks & Bitwise Operations


Layermasks are integers that inform a Raycast what to pay attention to. They are key. Once you start using them, you'll never go back and you'll be very glad you have this skill in your pocket.

What is a Bitwise operation? In this case, we'll be dealing with a bit shift. This requires a little bit of binary, so if you know all this stuff you can skip right to the line of code where the binary operation is.

Binary is a counting system exactly like our normal one (Decimal), but instead of counting all the way to 9 before reaching 10, we count to... 1. 0, 1, 10, 11, 100 are 0, 1, 2, 3, 4, respectively.

In any number system, the leftmost digit (or bit in binary) refers to how many of the highest exponent of the base are in the total value. In Decimal, 854 is literally 8 * 10^2 + 5 * 10^1 + 4 * 10^0. A 0 exponent always gives you 1 no matter what you're putting to it.

So, 11011001 is:
1 * 2^7 + 1 * 2^6 + 0 * 2^5 + 1 * 2^4 + 1 * 2^3 + 0 * 2^2 + 0 * 2^1 + 1 * 2^0
which simplifies to
2^7 + 2^6 + 2^4 + 2^3 + 2^0
which simplifies to
217

For Layermasks, we will go from 2 ^ 0 to 2 ^ 31. This is because we have 32 different layers in unity, each of which is assigned an integer from 0 to 31. If you say Layermask.NameToLayer("normalCollisions") in my code it will return 31.

So, the Layermask is always a 32 bit integer. But, what matters in a Layermask is not the value in Decimal, but the status of each bit. Each  Let's say your Layermask look like this:
1000 0000
0000 0000
0000 0000
0000 0000
The value is 1, but that doesn't matter. In this case, the Layermask tells the Raycast only to pay attention to 1 layer, Layer 0. If it looked like this:
1000 0000
0000 0000
0000 0000
0000 0001
then it would look at the first and the last layer. Its value is 2147483649 but again, that doesn't matter.

So how do we make a number look like this? Luckily you don't have to spell out your own binary numbers and convert them to Decimal. You just have to do a bit shift. A bit shift looks like this:

int collisionLayer = 1 << 31;

This means you're shifting a 1 to the 31st position in a binary sense. But that's just one layer. What if we want to do more than one layer? Easy.

int collisionLayerPlus = 1 << 31 | 1 << 30 | 1 << 0;

The | character indicates we're shifting more than one bit in an integer. Now the Layermask will look for collisions in the 31st, 30th and 0th layers. For fun, this is what the bit will look like:

1100 0000
0000 0000
0000 0000
0000 0001

If you're having trouble with any of this, please google Bitwise operations, or bit shifting, or even just layer masks and someone else will give you a better explanation (because there's lots out there :).

What I did was set up a class with static variables that contain these bitwise operations so I don't have to keep doing them in my code. This is what it looks like.


That's it! That's all it is. Now we use it elsewhere.

...What? You want an explanation of this too? OK fine...

Well first you'll notice the class doesn't inherit from MonoBehaviour. That's because it doesn't need to! I'm not going to put it on an object - in fact, I'm never even going to instantiate one. All it needs is those static ints that can be accessed from anywhere, at any time. I'll do that later.

The other fun thing in here is the static constructor. I don't fully understand how a static constructor works, but I guess it probably calls that when it needs to to give values to the variables I declare above. I can't use functions like Layermask.NameToLayer in a variable declaration like that so I had to use a static constructor.

Last, softBottom is what I call the kind of platform you can jump up through. softTop is what I call platforms you can fall through but can't jump up through. They're evil. And fun! :D

Now let's use the darn things!


Let's start with platforms that you don't hit your head on. Ones you can jump through from underneath but will then land on stably. Find the code where you look for things to bump your head on.

....we haven't done that, have we? Oh...

Well, we'll do it at the same time! It's related.

Here's the final code.


You'll notice it looks a lot like our other directional checkings. That's because it is pretty much the same.

There are two main points of interest here:


Here is where the character hits his or her head. If a platform is there, teleport to the point of contact, and set your velocity to 0. The other option (a la Mario) is to have a little rebound. I like to use a fraction of the upward velocity you were moving at, assigning it as a negative velocity.

And...


This is where we use the Raylayers class. It dictates what I'm going to detect with my up-layers. In this case, I will only bump my head on things in the NormalCollisions or SoftTop layers.

Now all you have to do is assign a platform the SoftBottom layer and you won't hit your head on it!

It's really that simple. A few lines of code and a lot of functionality. It's just as easy to add the SoftTop platforms (just add the right layermask) and to add one-way sideways platforms (which are also quite interesting).

I know my explanations in this post may be a little hasty, so if you have any questions please feel free to leave them in the comments and I'll get back to you as soon as I can. This was supposed to be a really short tutorial but it ended up... not being. ^_^

Thanks for reading!

Until next time...
Stay smart, little mite.

-mysteriosum(the deranged hermit)

Thursday, 13 February 2014

2D Physics in Unity with Raycasts: Slopes

Hello, faithful readers!

I have promised this update for a while, but have failed to deliver on account of being busy. I have done lots of acting in the last couple of weeks, and it has been great fun, but I'm starting to be sick of people and want to hole myself up with my squirrels for a while! Doing this tutorial (and more in the future) will help me forget other people exist for a while.

I actually did the coding for this within days of receiving the request, so this is far overdue.

The last post I did talked about jumping, and if you missed that you may want to look at it, though it's not necessary for this tutorial. What is necessary, though, is a basic understanding of the system: how I deal with gravity, and how I deal with lateral movement. Without having read these I'm afraid you'll be lost =)

Now, On To The Good Stuff

The first thing I did while trying to develop this system was put a slope in my scene and try it out. Turns out it kind of works already! Because of the way it's set up (the downward rays checking from the middle of the character), it teleports you to the point of contact in any case, so whether going up or down you'll still be in line with the slope in some respect.

It's far from perfect though. At first glance:
  • the character stops every time he reaches something like his max speed, because the side-check rays find the slope and think it's a wall;
  • the system only works when going up slopes of more than 90º (as in running to the left); 5+º (running to the right) slopes have you sink into them most of the way and cause all sorts of bugs;
  • we move the same speed as we would on a flat surface (which may or may not be desired); and
  • we jump straight up (again, we might want this but we'd like to have the option).
So that's just a couple of problems but they're still going to take a lot of work to sort. We're going to need some inspiration...

Case Studies

An important thing to do when tackling this sort of problem is ask yourself, "what have other people done?"

Super Mario World

For the first problem, I'm going to call on Super Mario World for the SNES.

What I'm going to for this is calculate the angle of the slope we're standing on. I will then use that  For reference, I'm going to link another guy, Jdaster64, who did an in-depth analysis of this stuff. Astounding.


From this, we see there are 4 angles of slope in Super Mario World: 11º, 23º, 45º and 67º. For 11º, there's no change for anything. So that tells us: we should consider implementing some threshold angles. For instance:
  • At 23º we reduce the player's max speed going uphill, and increase it going down;
  • At 45º the player starts moving automatically down the hill;
  • At 67º the player will have a very hard time controlling movement, and will even fall off the platform should they move with the slope enough.
We don't have to choose these exact angles, but we should set it up so that no matter the angle, we react accordingly. This means we're doing a general system, not a specific one - which may be the wrong thing to do, but that's what programming is all about!

Guacamelee

Guacamelee takes a much more laissez-faire approach to slopes, which is appropriate for its genre as Metroidvania (which always includes lots of combat). Ease of control is of paramount importance in this genre, so introducing hidden mechanics like those in SMW is not practical.

Guacamelee only has a couple of slope values, but in general it's a binary issue: either you can walk on the slope, or you can't. If you can walk on the slope you move at the same X speed as normal and jump straight up.

Frankly, this is the modern trend. Most platformers choose to doff the slope physics given to us by arguably Nintendo's greatest platformer. That's fine! Things are moving forward! With that in mind I won't go into how to bring SMW style slope mechanics to our projects just yet. I will focus on the most important problems.

Disclaimer: since the last tutorial on lateral movement, I changed this whole system to Unity's 2D physics. I did this because it's much easier to achieve a slanted collision with the 2D Polygon Collider than it is to make a 3D mesh in Blender or something and import it. If you can manage that last part go ahead; the system is almost identical.

What's Different in Physics2D?

Not much, really. The biggest thing is the Raycast method. Instead of returning a boolean, it returns a value directly to a RaycastHit2D object (making this a required step instead of an optional one). This is okay since we use RaycastHits anyway and it's just as easy to check if a RaycastHit2D hits something than it is to check a boolean.

Here's what the code now looks like:


Each Vector3 has been replaced with Vector2, we now test to see if (hitInfo.fraction > 0) instead of if (connected). hitInfo no longer has a .distance variable, so we have to make due with the hitInfo.fraction they give us. Other than those, pretty much the same thing.

Fix: Collision Problem (slopes aren't walls, silly)

The most immediate concern for us is the fact that we collide with slopes as if they're walls. I noticed this even on the slightest of curves, so it's time to mess with our lateral movement scripts a little.

What do we need to change?

The problem with the code as it stands is that the moment one of the rays hits something, the system goes "OH YEAH I got something it's a wall f'sho don't worry about it I got dis." This is not necessarily the case! I'll need to check how many rays hit, and retrieve the normal of the surface I hit. After all, if the slope is steep, we might hit the wall with multiple rays. This will also give us the tools to apply this to the downward rays.

This is what the new version of my Raycast section for lateral movement looks like:

The first thing you may notice reading from the top is that I've removed the +/- margin from the start and end points. This means I'll be checking right from the bottom to the very top of my character's collider:


The whole reason I had that margin to begin with was so that I wouldn't collide against the floor as if it were a wall. Now that I'm going to be calculating the angle between multiple rays' connection points, this is no longer relevant.

You'll also notice that instead of just using one RaycastHit2D, I'm using an array of them. This way I can reference any or all of them in or out of my for() loop.

When One Ray Just Isn't Enough

Now, first: how do we know we've connected with more than one ray? With a little variable I like to call lastFraction.


lastFraction does what it suggests: stores the value 'fraction' of the previous connecting ray's RaycastHit2D object. If its value is 0, that means no other ray has connected thus far, and we won't bother checking an angle or anything. We will simply store the current fraction in lastFraction.

Disclaimer: As it is, lastFraction is within the if(hitInfos[i].fraction > 0) clause, which means it doesn't get reset after a successful connection. As a result, any two successful rays will trigger a check. If you want to make it so that only 2 consecutive rays trigger it, put the last line of this block of code as the last note of your for () loop.

What's Your Angle?

To calculate the angle between two points, we'll use Vector2.Angle(). At first I tried just plugging both points into this and using that but that's not how Vector2.Angle() works. No, for Vector2.Angle, you pretty much always want the first argument to be Vector2.right, which is (1,0), or 0º. Then give it the difference between the two points, which will give you the delta of that Vector:


Now we see if it's within the proper range of what we want. In this case, I've set angleLeeway to 5, meaning if angle is less than 5 (or more than -5), we'll ignore it because it's not a wall. Of course, you may want to tell the player he can't climb up an 85º wall, so you can change angleLeeway as you see fit.

That's it for that! Your player should no longer think slopes are walls.

Fix: Sink Problem (The One Ray To Rule Them All)

The other major problem is that the player object seems to sink into the slope. In fact, the script will always use the first ray that connects as the reference for where it should be along the y axis. In this case, it's ray on the far left, so that's why when travelling right, he'll 'sink' into the slope.

So, to solve this problem, I've once again conjured Guacamelee as my reference. Here's how much Juan cares about slopes:
Why yes, this costume does imply that I 100%'d the game! Thanks for noticing! ^_^
Wow, Juan. Your one foot is barely touching the floor. Very suave. Realistic... oh well, we can't all be perfect!

This is actually a very sensible and intuitive solution. As a player, you might not even notice it without having it pointed out! It's certainly much less weird than if his foot were inside the floor. This also allows the level designer to put slopes of any angle and it doesn't matter a bit.

The Short Stick

Achieving this is surprisingly simple, from what we have so far. The system shoots multiple rays down from the central X axis of the player. All you have to do is determine which of those rays is the shortest, and use that in your calculations!

Here's what the final code looks like for this:


The first thing you'll notice if you're clever is that I'm once more using an array of RaycastHit2D. This is important for this problem, but we'll also use it later if we're going to implement slide-down-the-slope or jump-at-an-angle features down the line.

For Loop, For Loop on the Wall, Who's the Shortest of Them All?

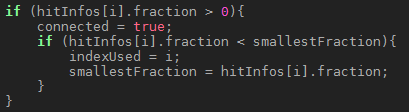
To find the shortest ray, all you have to do is declare the variable smallest fraction and assign it later on.


We start it at Mathf.Infinity because everything is smaller than infinity :)

Also declare indexUsed, which will tell us what position of our RaycastHit2D array we want to reference when we finally give the command to hit the ground.

Then we want to assign these variables. Again, it's trivial:


Any fraction smaller than the smallestFraction value will set a new smallestFraction, and with it, the indexUsed variable. We use the index after the for() loop if connected is true, and go about our business as usual.


Since the system already teleports you to where the ray hit, there's no need to change anything else!

That's it for now...

I hope this helped those of you who are following me and have wanted to use slopes in your games. This system makes it so you can have slopes of any angle, with a cutoff angle where they start to be considered walls.

Next time I will go into more complex nuances of slopes, as described in the SMW breakdown. I don't think it'll be super complicated but it will be worth doing! If you have any questions at all, feel free to leave a comment. I will answer as soon as I can!

Thanks for reading.

Stay bright, burning star!

-mysteriosum(the deranged hermit)

Tuesday, 28 January 2014

2D Platforming Physics With Raycasts: Jumping

Hello, faithful reader(s)!

It occurs to me that I didn't actually explain how I do the jumping in my system. It's simple, but there's a couple of nuances that should be discussed.

Basic Version

Jumping in Unity can be as simple as:

void Update (){
     if (grounded && Input.GetButtonDown("Jump"){
          velocity = new Vector2(velocity.x, impulse);
     }
}

This works, but there's a hidden mechanic in most of the platformers you play that you might not realise: you can actually press the jump button right before you land, and jump immediately as you hit the ground. If this feature is absent, your game will feel glitchy. The player expects this leeway. This means we're going to have to record when, not just whether,  the jump button is pressed.

Disclaimer: Unity has a function, Input.GetButtonDown(). I don't trust it - I find sometimes it just doesn't register. So I work around it with Input.GetButton, which returns true every frame the button is pressed.

Better version

My code looks something like this:

void Update (){
     bool input = Input.GetButton("Jump");
     if (input && !lastInput){
          jumpPressedTime = Time.time;
     }
     else if (!input){
          jumpPressedTime = 0;
     }

     if (grounded && Time.time - jumpPressedTime < jumpPressLeeway){
          velocity = new Vector2(velocity.x, impulse);
          jumpPressedTime = 0;
     }

     lastInput = input;
}

So a couple of things at work here. First, the time we pressed the jump button is recorded only if the previous frame, it wasn't pressed. Every frame we're grounded, we'll test the current time against the pressed jump time, to see if it's less than our jumpPressedLeeway variable (which is usually like 0.1). Then we jump if that's true (if we're grounded).

Setting the lastInput at the end is essential to check if this is the 'JumpDown' frame.

Disclaimer: I haven't tested this code. How fun! Check it, see if it works. Let me know what's wrong!

You can also add other conditions to the jump check. If you have a double jump, your condition may want to read:

if ((grounded || !hasDoubleJumped) && Time.time - jumpPressedTime < jumpPressedLeeway)

This way, grounded and not having double jumped will both satisfy the jump condition - but you'll also have to add:

     if (!grounded)
          hasDoubleJumped = true;

Then when you land, set it to false again.


That's it for now. Soon, I will go into doing slopes with this kind of system. I will also discuss jumping in a little more detail as it pertains to the system of checking downward for stuff. You'll see.

Thanks for reading!

Until next time: stay real, natural numbers.
-mysteriosum(the deranged hermit)

Monday, 20 January 2014

2D Platformer Collision Detection with Raycasts, Part 2: Lateral Movement

This is part 2 of a series; click here for part one.

Hello again, faithful squirrels - err, readers. This is the second post in a series wherein I discuss my home-brewed 2D platformer physics in Unity3D. Last time I talked about the basics of Raycasts, then applied them to movement in one direction (gravity). This time I'll be talking about applying my Raycasting method to lateral movement. The process, as you may have guessed, is the same for lateral movement, so it won't be as long to explain as gravity since we're already familiar with the method. I'll then explain jumping, which is also super easy (1-5 lines of code, tops).

DISCLAIMER: I discovered after writing the last article that Unity implemented native 2D physics and collision detection in a version of Unity I hadn't updated to yet. I've implemented my whole thing with 2D box colliders and 2D Raycasts, but it works the same either way. So I'm going to continue this tutorial with 3D box colliders which will be handy for anyone doing a 2.5D platformer, or for other fun experimentations.

Recap

To implement gravity and collision detection, I use the following steps:


  1. Set up variables, like gravity and max fall speed, and gather information about the GameObject;
  2. Apply acceleration to my movement: in this case, downward acceleration due to gravity;
  3. Determine whether it makes sense for me to check below me for collisions (am I on the ground? or if not, am I falling?);
  4. Determine where the rays I'm casting will begin (a few of them in a line);
  5. Determine the length of all rays (they'll be the same, and check as far as my downward velocity);
  6. Cast each ray and ask if it hit anything;
  7. Use the result (if I'm on the ground and I didn't hit something, now I'm falling, and vice versa).
Here's what the rays would look like if we drew them:


For checking above, the lines will look identical but face up, and for lateral movement they will start along a vertical cross-section and reach out to the side.

Let's Boogie

Now let's take a look at the system applied to lateral movement. Here's what the code looks like:


There are lots of similarities but also some key differences. Let's go through them.


Input

Since we're now responding to the player's input, we have to get it from somewhere. My input code looks like this:


and that's it! Unity's inputs are generally set up well enough for this purpose, but if you want to play with it then go to Edit > Project Settings > Input to look at the data structure.

One thing to note about this is I use Input.GetAxisRaw instead of Input.GetAxis. The difference between the two is when it comes to keyboard input. All Input.Axis functions return a float between -1 and 1. When reading input from a keyboard, Input.GetAxis moves slowly toward the limit rather than snapping to it (which GetAxisRaw does). For example, if I want to move the character left using the keyboard, I'll press A or the left arrow. The first frame, using Input.GetAxis, will return something like -0.15. Then each frame it will go up by that amount until it caps at -1. This isn't what we want here, since we'll be multiplying things by our input. So, we use GetAxisRaw, which will only ever return -1, 0, or 1 when using a keyboard.

Applying movement

This was simpler with Gravity. We just checked if the player was grounded, and if they weren't, we subtracted from their vertical velocity (capping at a maximum fall speed). This is what I do to apply lateral movement.


I like to work with local variables - in this case newVelocityX. In C#, there's no way to alter one component of a Vector directly (in Javascript you could write "velocity.x += acceleration * input").  So, it's simpler to work with a new variable.

We're going to deal with an input of 0 differently, since that's deceleration and not an acceleration. Add acceleration * horizontalAxis to newVelocityX, then make sure it's not gone past the maximum speed. The principle is similar for deceleration.

Raycasts

This operation is nearly identical to that of gravity, with one exception: the direction of the rays is determined by our velocity. See here:


If we are going left, we check left, otherwise we check right. If there's no input we don't check at all. If the player holds a direction towards the wall, we know it connects on that side. There is the unfortunate side effect of doing a Translate of 0 every frame this happens but the pros outweigh the cons here. If I want to code Megaman's wall jump for example, I just have to set a variable like "bool wallHanging" to true if one of my rays connects. Then I can use the input and invert it to determine the direction he'll be jumping away from the wall (or hitInfo.normal for that matter).

Only the beginning

From here, the possibilities are endless. Try something fancy! For starters I suggest figuring out how to check above the character as it's jumping, to react to ceilings using this method.

I never even got into layer masks in this explanation. A layer mask will let you pick and choose what objects you want to detect. So if you want to make a platform you can jump through from underneath, just tell the rays you send up not to detect those platforms. Then when you're falling the downward ray will find it and you'll be golden.

Using this method you can implement: moving platforms; slanted surfaces; icy surfaces or other movement detriments; or a whole thwack of other things I can't think of right now.

I am really enjoying doing this sort of work, and I believe my next tutorial will be about bouncing off walls (like for an astronaut in a pinball machine, let's say).

Thank you so much for reading. Until next time, keep moving, kinetic beings!

-mysteriosum, the deranged hermit.

Saturday, 4 January 2014

2D Platformer Collision Detection with Raycasts, Part 1: Gravity

Hello, squirrelfriends! Today I'll be writing about one of the things I've done in Unity: specifically, coding my own collision detection using certain aspects of Unity's physics, and simple maths & physics (for Recess Race!).

Why not just use Unity's physics?

Good question! The short answer is Unity's physics are meant for 3D movement, and they're great for that. Their basic character controller uses a capsule collider. It's pretty essential for 3D, but it doesn't work for classic SNES era 16 bit platformer tropes.

Consider this image:
Wile E. Coyote wishes he could do this

Now, that's not realistic. You can't stand like that! but it makes sense when you think about the strictly-rectangular collision detection they had at the time. It was a hardware/software restriction but they ran with it and made the restriction into an asset. Here's the same image with an approximation of his hit box:

He benefits from intangible toes, forehead, and right fist

The tiny part of the box touching the collision tiles supports him. Walk any further and you fall off. This feels very fair for the player: he's allowed to put his centre of gravity over a pit, but he can't support himself with just his toes. A little 'cheating' is enough. It also allows for what feels like really close calls - if an enemy swoops down and skims your helmet, but you don't get hurt, it creates a "WOW that was close" moment, which is fantastic.

Consider the same scene with a capsule collider now:

Paint capsules!

The only point that will touch the floor on a capsule is the bottom point. Since it's not touching anything, you'll fall. Then the curve of the capsule hits the corner of the tile, and you slide away from the wall and you fall. It's a different effect, and not one I'm going for in Recess Race,

Build it from the ground up (using Unity's construction materials and power tools)

So it's clear we can't use the packaged Unity character controller. It is impossible to separate from the capsule collider. So we'll have to build our own, using a box collider!

Aside: Unity Colliders, Events, and Rigidbodies

When you make a new script in Unity, it gives you the Start() and Update() functions built in. These are events that are called when Unity feels like it. Among these are the OnCollisionEnter() and OnTriggerEnter() functions. Their utility is paramount, but there are some issues. Both of them require having a Rigidbody class on one of your objects. It makes sense, because if it didn't discriminate it would be checking every collider against every collider every frame and that would take aeons.

Solution: put a Rigidbody (Component > Physics > Rigidbody) on your controller, uncheck 'Use gravity', open the Constraints class and check all of the boxes. This way we can have it use the Collision events and also control its movements at all times.

This is what your Rigidbody component should look like

Intro to Raycasts

If you're familiar as heck with Raycasts, a "Ray-man" if you will, you can skip this section.

Setup

The Raycast is a versatile tool in Unity, and it's surprisingly cheap. You can probably do hundreds of raycasts per frame and it won't do much to slow down your processing speed (but, the fewer the better).

A basic raycast in code looks like this:


This bit of code shoots a ray straight up from the object's pivot (transform.location) and tells you if there's anything above you (Raycast always returns a boolean). Not super useful on its own, but that's just the beginning. There are multiple ways we can call the Physics.Raycast function (12 overloads!). Let's add a couple more to add some more utility:


Here, we've added 2 new arguments to the Raycast function: a float, 'distance', and a RaycastHit. The float just tells the engine how far to check. In this instance, it will only check as far as I'm going to move this frame, which is very useful. It will tell me if I'm going to hit the ceiling! (This code is a little dubious and I'll explain why later).

The other addition is the RaycastHit, which uses the 'out' keyword next to its argument because it receives information (is assigned values) from the function if the Raycast returns true. This is supremely useful, as it tells you exactly how far the ray travelled before it connected, the normal of the surface it connected with, as well as a reference to the collider it hit. We will be using this to great effect later on.

The last thing we'll add to the Raycast function is the Layer mask. This tells the system to look for (or ignore) specific Layers. In Unity, you can give every object a different layer (up to 32 different ones), so this is handy when checking for collisions. In this case, I've set my collision objects to the layer, "normalCollisions". Here's what it should look like in code:


You can use a layer mask to check more than one layer. This post has an explanation of how.

So now we have a ray that only looks for collisions, it's time to make multiple rays shooting out in every direction to look for collisions ^_^

The Nitty Gritty

This is the method I've developed. It's probably been developed other places, but I don't have a single place to attribute my ideas, just a lot of bits and pieces which culminated in this system.

The Gist

The idea is to shoot a number of raycasts out each side of your box collider, and if any of them connect with something, do stuff. If you're checking underneath you, you're now grounded. If you're looking left or right, you hit a wall, and if you're checking up you've hit the ceiling. It's elegant, but tricky.

Setup

So first, let's set up some variables. Here's what I've got

Disclaimer: I use FixedUpdates for my velocity calculations, and update movement in the LateUpdate() function using Time.deltaTime as a multiplier. This gives precise, predictable movements.


This should keep us going through most of the explanation
Here's what I have in functions already:
  • set up of Layer Mask;
  • definition of 'box' and 'position'. On their own they do nothing, but it saves us a lot of typing later on. Mark every time I use 'box.x' I could instead type 'collider.bounds.x' but it's much longer;
  • and the application of movement at the end. Since it happens after everything else (LateUpdate), I can use the velocity variable knowing the object hasn't moved that distance yet.

Gravity

Let's start with the simplest operation: gravity. Gravity is present in every platformer (uh, I think), so it's a good place to start. This is all in the FixedUpdate() function.

Here's what the final thing looks like:


First, let's the actual gravity numbers to the velocity. We do this first so we can predict its location when we look for the ground.


Next, I figure out exactly where I want to check beneath me. For this I'll use the 'box' variable I define at the beginning of my FixedUpdate. One of the tricky things about Raycasts is that it only connects going in to a collider, not coming out of one. We can take advantage of this, though, by starting the rays in the middle of the player's box collider, so that it doesn't ever detect it, but will detect anything outside.

My method for determining where each of my rays starts uses the Vector3.Lerp function. I figure out where  my first ray and my last ray will start, then use the Lerp function to iterate from one to the other. These are vertical rays, and will all start from the same y position in the scene.

We also have to determine how long we want these rays to be. If we're on the ground, just using a flat number (in this case I'm just using my 'margin' variable). Otherwise, we want to base it on our velocity. The trouble is, if we're falling, our velocity is negative, and Raycasts need the 'distance' variable to be positive (this is the dubiousness I spoke of earlier). So, we're going to check down only if our 'falling' variable is set to true, which happens if our velocity is below 0. Then we have to make it positive with a Mathf.Abs() function. Also add half the box height since we're starting in the middle of the box.


These two points should look like this on our box:


All of our rays will start between those two points (inclusively). To iterate between them, use a 'for' loop. Before going into the loop, set up a boolean so we can use it afterwards.


Use the Lerp to pick the start point, then add your already-determined ray length.

Finally, when we determine if all of the rays hit or not, we deal with the results.

There is a mistake here - I multiply the ray's distance by Time.deltaTime which is unnecessary and causes you to float to the ground. Ignore it!


If we're in the loop, and we meet something, we're going to want to get out of the loop so the next ray doesn't set connected to false or something silly. You'll also want to make sure you're flush with the ground, by immediately translating down to the surface, and set your vertical velocity to 0. If you're not finding anything, you're no longer grounded (then the rest takes care of itself).

Also note: you can slip in an Event or Delegate function to call when you land (or as Unity likes to do, use the "Send Message" function for something like "OnLand"). This makes it easy to set land animations, or for other objects to pass functionality for this kind of event (like if you want to poison your character and have it end when they hit the ground or something).

That's it for now

That's it for gravity, really. There are fancier things you can do like determining the slope of the platform you're on, or move with a moving platform, which are all pretty easy to do with this foundation.

All the code is in screen shots, deliberately - I have always found it more beneficial to type stuff out yourself, even copying it directly, than pasting it and checking to see if it works. I hope you agree!

Next time I'll be talking about moving left and right and hitting the ceiling. However, the techniques are largely the same, so I encourage you to give it a go yourself :)

Thanks a lot for reading. Until next time!

Stay grounded, earth wizard.

-mysteriosum(the deranged hermit)


Wednesday, 1 January 2014

A New Year, A New Process

It has been a while since I've posted on my devlog - too long. I haven't felt like there's been enough to update you all about, I suppose. Now, there is! It's the new year, and new things are happening.

First, I, inspired by my sister, The Singing Nerdess, have developed a routine. This is something I will follow to the best of my abilities every day in the new year. The goal is to get my doing stuff, as often as I can.

Routine, process, habit, practice - all words describing the ritual execution of specific tasks to the end of being productive and building skills and experience. This article does a very good job of describing why we should (as creative people) develop a routine (called Process here).


My new process is this:


  • Every day I will:
    • get up at 7;
    • do 30 minutes of yoga;
    • do 15 minutes of calligraphy (general practice or letter-writing);
    • work on Recess Race for 4 hours;
    • miscellaneous internet-related tasks (web site, twitter, blog, forums);
    • act or write for 30 minutes.
These figures are all guesses, and I may do more or less depending on how I feel or time restrictions or whatevs. They should resemble my weekly averages, on the other hand. 

I have completed the majority of the new design document for Recess Race. It's a bit of a bummer because I wanted to get it done for today (New Year's Day). But, it's the holidays gosh darn it and I enjoyed myself. That's important too! Anyway, the whole point of the article referenced above is that you don't need goals. Goals hold you back in a weird way. They are somewhat counter-productive, which is counter-intuitive, but I certainly feel it happening now. Don't worry about what you have and haven't done, just do stuff and it will be done eventually.

"It doesn't matter how slowly you go, so long as you never stop."
-Paraphrased

I believe I can keep up this routine, and I will be all the better for it. If you're a creative person and don't feel like you're getting enough shit done, I highly suggest this method. 

Thanks for reading. Until next time!

Stay consistent, rolling stone.

-mysteriosum(the deranged hermit)